

Pattern Description:
This free reversible grocery tote pattern creates roomy, durable, and washable bags with a sturdy rectangular bottom and reinforced straps.
Made from two coordinating cotton fabrics, the tote is fully reversible and capable of carrying heavy groceries.
The design includes boxed corners, neatly finished edges, and top-stitched straps for strength, making it a practical, eco-friendly alternative to disposable bags.
Materials Needed & Measurements:
Materials Needed:
- 1 1/2 yds of 44″ wide cotton fabric
- 1 1/2 yds of 44″ wide cotton fabric in a coordinating color/pattern
- Disappearing fabric marker
- Sewing supplies
Measurements & Cutting Instructions (Per two bags):
- Cut four 20 inch squares from each piece of fabric (8 squares total).
- Cut two 6 x 20 inch rectangles from each piece of fabric (4 rectangles total, for straps).
Construction Measurements:
- Stitch seams using a half inch seam allowance.
- The rectangular bag bottom is formed by folding the side seam to the bottom seam. Use a ruler or grid so that there is 3 1/2 inches between the corner and the ruler edge (perpendicular to the seam) to mark the stitching line.
- Cut off the corner 1/2 inch from the corner stitching.
- Stitch the strap edges 1/8 inch from the edge along both long edges.
- Fold the top of each bag piece over one inch and press.
- Straps are aligned along marks placed six inches from the side seams.
- The ends of the strap should go one inch into the bag.
- Top stitching around the bag opening is done twice: once 1/8 inch from the edge and once 1/2 inch from the edge.
Instructions for Making the Reversible Grocery Tote Pattern:
Preparation and Cutting
Before you begin the project, wash and dry your cotton fabric. You will need 1 1/2 yards of 44″ wide cotton fabric and 1 1/2 yards of 44″ wide cotton fabric in a coordinating color/pattern, along with a disappearing fabric marker and general sewing supplies.
For one bag, you will need to cut the following pieces from your fabric sets:
- Four 20 inch squares (two for the bag exterior, two for the lining).
- Two 6 x 20 inch rectangles (for the straps).
Assembling the Bag Body
To assemble the body of the outer bag:
- Place two of the 20 inch squares designated for the bag fabric right sides together and pin them.
- Place the two 20 inch squares designated for the lining fabric right sides together and pin them.
- Stitch around three sides of each set, utilizing a half inch seam allowance.
- Once stitched, press the side seams open.
Creating the Rectangular Bag Bottom
This process creates a sturdy, rectangular bottom for the bag.
- Starting in the bottom corner of either the outer bag or the lining, fold the side seam to the bottom seam of the bag. Ensure the two seams are aligned and the fabric remains right sides together.
- Place a ruler or grid so that there is 3 1/2 inches between the corner and the edge of the ruler that is perpendicular to the seam.
- Use the disappearing fabric marker to draw a line along the edge of the ruler.
- Pin along the drawn line, and then stitch along the line.
- Remove the pins, and cut off the corner 1/2 inch from the stitching.
- Repeat this process of folding, stitching, and trimming with all remaining corners of both the outer bag and the lining fabric.
Constructing the Straps
Use the two 6 x 20 inch rectangles to make the straps.
- Place one strap rectangle face down on your ironing board.
- Fold the strap in half lengthwise, with wrong sides together, and press to create a center line; then open the fabric.
- Fold one long edge to the center line and press.
- Fold the other long edge to the center line and press.
- Fold the entire piece in half lengthwise and re-press the center line.
- Stitch 1/8 inch from the edge along both long edges of the strap.
- Repeat these steps for the second strap.
Final Assembly and Top Stitching
- Fold the top raw edge of each bag piece (the outer bag and the lining) over one inch and press around the bag opening.
- Turn the outer bag piece right side out.
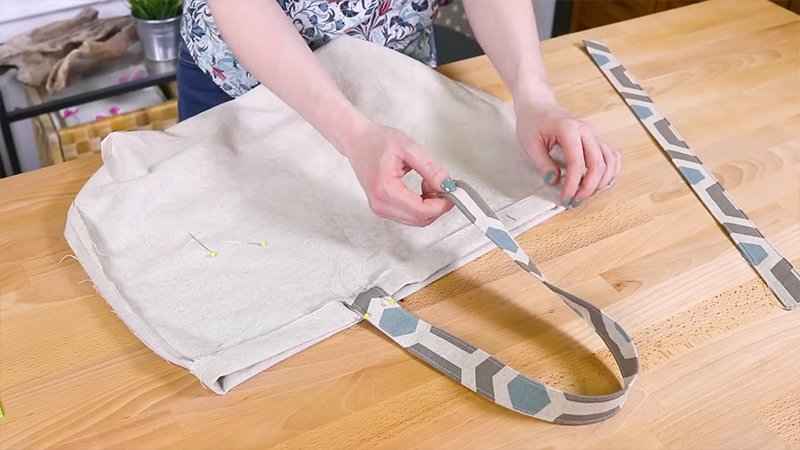
- Use your disappearing fabric marker to mark the strap placement six inches from the side seams on the outside of the bag.
- Align the outer edge of the straps along these marks. The ends of the strap should extend one inch into the bag. Pin the strap in place. Repeat with the second strap on the opposite side of the bag.
- Insert the lining into the outer bag so that the wrong side of the lining and the wrong side of the bag are together.
- Pin around the top opening of the bag.
- Stitch around the top of the bag twice: once 1/8 inch from the edge and once 1/2 inch from the edge. A zig zag or decorative stitch is an optional alternative for finishing the top edge.
Keeping your finished bags handy, such as in the trunk of a car, allows for easy use whenever you go to the store.